Camera Settings
How to Edit and Export HD Footage of a Vertical Instagram Reel Video Through Final Cut Pro X

In the ever-evolving world of social media, creating eye-catching and high-quality content is essential to capture your audience's attention.
In the ever-evolving world of social media, creating eye-catching and high-quality content is essential to capture your audience's attention. Instagram Reels has emerged as a powerful platform for short-form videos, and to stand out, you'll want to upload your content in the highest possible quality. In this step-by-step guide, we'll walk you through how to upload HD footage of a vertical Instagram Reel video through Final Cut Pro X. Whether you're a content creator or a business looking to engage with your audience, Final Cut Pro X can be your secret weapon to ensure your videos not only look stunning but also maintain the integrity of your creative vision.
Step 1: Create a New Project
- Click on "File," then "New," and select "Project."
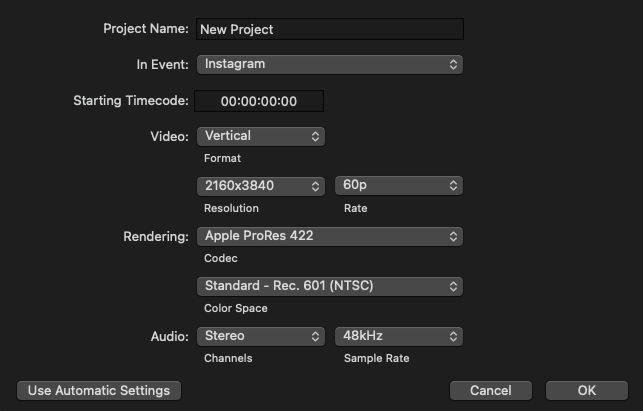
- Set the project properties to match your video's resolution and frame rate.
- Name your project and click "OK."
- Below is the example settings
Step 2: Edit Your Vertical Video
- Drag your imported video into the project timeline.
- Use Final Cut Pro X's editing tools to trim, add effects, and enhance your video as needed.
Step 3: Export Your Video in the Correct Format
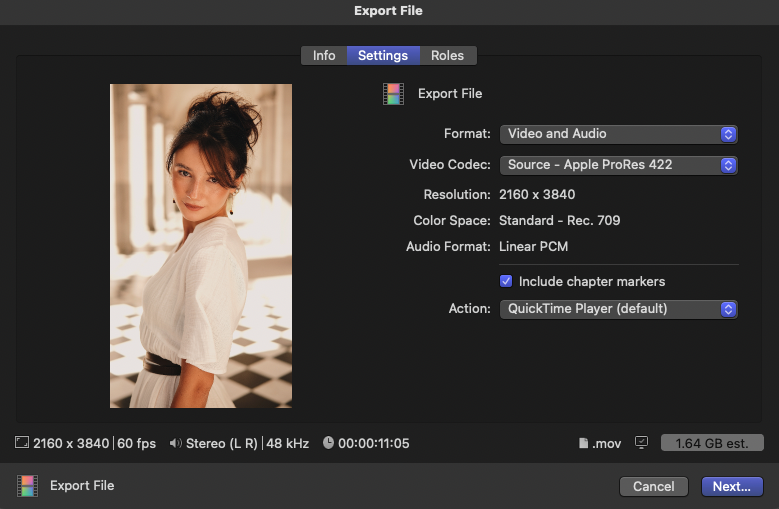
- Go to the upper-right corner of the Final Cut Pro X interface and click on the "Share" icon.
- Select "Export File" from the options.
- Next, click on the "Settings" tab, and ensure that your export settings match the following:
After exporting, if you find that the file size is larger than desired, you can further optimize it by using QuickTime Player's export options. Here's how:
- Locate the exported video file on your computer.
- Right-click on the video file and choose "Open With" > "QuickTime Player."
- Inside QuickTime Player, go to "File" and select "Export As" or "File" > "Export."
- Choose the "4K" option or any other desired resolution that helps reduce the file size while maintaining quality.
- Adjust any additional settings as needed, such as compression settings or quality presets.
- Click "Save" to export the video with the new settings, which should result in a more manageable file size.
Step 4: Save the Exported Video
- Choose a destination to save your video file and click "Next" or "Save."
Step 5 Upload to Instagram Reels
-
Transfer the exported video to your mobile device, making sure it's accessible in your camera roll or gallery.
-
Open the Instagram app on your mobile device.
-
Tap the Reels icon located at the bottom center of your screen.
-
Select your video from your camera roll or gallery.
-
Before posting, it's essential to ensure your Instagram settings are optimized for high-quality video uploads. Here's how to do that:
-
In the Instagram app, go to your profile by tapping your profile picture at the bottom right.
-
Tap the three horizontal lines at the top right to open the menu.
-
Scroll down and tap "Settings."
-
Under Data Usage and Media Quality:
- Turn off "Use Less Cellular Data" (indicated by the toggle switch being gray). This ensures that Instagram doesn't compress your video heavily during upload, preserving its quality.
- Turn on "Upload at Highest Quality" (indicated by the toggle switch being blue). This setting allows your video to be uploaded at its maximum available quality.
-
-
After confirming your Instagram HD photo settings, return to the Reels upload screen.
-
Here, you can add any desired captions or effects to enhance your video.
-
Once you're satisfied with your video and captions, tap the "Share" button to post your high-quality Instagram Reel for your audience to enjoy.
-
After confirming your Instagram settings, return to the Reels upload screen.
-
Here, you can add any desired captions or effects to enhance your video.
-
Once you're satisfied with your video and captions, tap the "Share" button to post your high-quality Instagram Reel for your audience to enjoy.
By following these steps and ensuring your Instagram settings prioritize video quality, your Reels will shine with the same high definition you worked so hard to achieve in Final Cut Pro X.
In the competitive world of Instagram Reels, your video quality can make all the difference. By following this guide and using Final Cut Pro X, you've learned how to ensure your vertical Instagram Reel videos are not just visually appealing but also maintain the highest quality possible. Whether you're showcasing your creative talents or promoting your brand, the steps outlined here will help your content shine. Remember, in today's digital landscape, it's not just about what you post, but how you present it. With the right tools and techniques, your Instagram Reels can leave a lasting impact and keep your audience coming back for more. So, go ahead and share your stories with confidence, knowing that your videos are optimized for the best viewing experience.
Related Posts

Camera Settings
Nikon Z5II Camera Settings for Portraits: Best Auto Focus Setup Guide
Complete Nikon Z5II camera settings guide for portrait photography — exposure mode, JPEG quality, white balance, AF-C, 3D tracking, and focus priority settings explained.

Camera Settings
Portrait Photography: Essential Poses and Compositions for Stunning Shots
Welcome to my blog post on portrait photography! Whether you're a seasoned photographer or just starting out, understanding different poses and compositions is key.

Camera Settings
Which Stops of Black Pro Mist Filter Should You Use for Your Lenses Portraits? K&F Concept
Today I am going to talk about my experience on using K&F Concept Black Diffusion filters on different lenses with various focal length, and what is the best stop for the particular focal length's por…
Newsletter
Stay in the loop
Explore
From the Gallery


